Unfortunately the book's treatment while likely adequate is not as expansive as I would have hoped. Which by the way is the problem with all books about boatbuilding. They all seem to give endless detail about things that are not important to me, and very little detail on the the things that are. My take away tonight will be that I need to be even more careful than usual about not being in a rush. I've probably got at least two more days just to get the keel put on so I've some time to continue stewing about this.

The Searchlight
Monday, February 29, 2016
Up At Night Thinking About Transition Joints
I woke up (at 1 AM) thinking about how the planking is going to get put on the boat. Not that surprising in itself. Perhaps more surprising is that I know something about this! Before I started this obsession I read several books on plywood boatbuilding. I considered this my due diligence before jumping in, but if I'm honest my mind was really made up. So there I was, awake and stewing about the garboard to keel joint at the bow. When I remembered that I had seen this in one of my due diligence books (Boatbuilding With Plywood, Glen L Witt). The problem is that I need the planking to make a transition from interfacing the keel on one face to another. Apropos, the book calls this a transition joint. Here is a quick sketch.

Unfortunately the book's treatment while likely adequate is not as expansive as I would have hoped. Which by the way is the problem with all books about boatbuilding. They all seem to give endless detail about things that are not important to me, and very little detail on the the things that are. My take away tonight will be that I need to be even more careful than usual about not being in a rush. I've probably got at least two more days just to get the keel put on so I've some time to continue stewing about this.
Unfortunately the book's treatment while likely adequate is not as expansive as I would have hoped. Which by the way is the problem with all books about boatbuilding. They all seem to give endless detail about things that are not important to me, and very little detail on the the things that are. My take away tonight will be that I need to be even more careful than usual about not being in a rush. I've probably got at least two more days just to get the keel put on so I've some time to continue stewing about this.
Sunday, February 28, 2016
Another Day, Another Baby Step
I suppose every day can't be lots of fun in the boat shed. It rained off and on all day today so it made it hard to do much. I did get the keel sides (forward and aft) scarfed and glued, plus did a little fairing work and a little epoxy coating with the epoxy left over from gluing up the keel. Here is a pick of the scarf cut for the keel joint.

Also its time to invest in new gloves.


Also its time to invest in new gloves.

Latest Rig Thinking (Now New And Improved!)
I am planning on putting backing plates and stainless T-nuts in the deck for all the deck fittings. To do that I need to know what all the deck fittings will be and where they will be located. To do that I really need to have my rig approach solidified.
I joined a sailing club so I could sail while not owning a boat. Turned out I needed to join ASA (American Sailing Association) in order to join the club. Turns out that the ASA membership comes with a subscription to Sailing magazine. Unsurprisingly many vendors of sailing stuff advertise in this magazine. While leafing through this magazine I came across this.

Company link here: Boom Kicker
The problem I was having is that trying to line up the forward end of the boom with the as designed angle meant long spars to hold the boom (from the bearing) that were looking heavy and unwieldy. But if I have a way to hold the boom up from the bearing then I could get rid of the long spars and the topping lifts.
This also changes the nature of the rig. Even though it will have a wishbone it will in effect be a split conventional boom. That said, counting control lines I think it should be as simple to use as a real wishbone rig. I'm counting 4 running lines, the vang, the outhaul, furling line and the mainsheet. I'm no wishbone rig expert but I think it uses a snotter, a halyard, an outhaul, and a mainsheet (perhaps the outhaul could be considered standing rigging). So here is the concept.

By using the Boom Kicker I can angle the boom up instead of down. So you still avoid hitting yourself in the face with the boom. Things might get a bit crowded at the bearing so I will have to be careful of that. In operation I would use the vang to adjust boom position to get the sail to share the tension between its upper and lower parts as needed. The outhaul is used to adjust overall sail tension and release the sail to be furled.
Next step is a little bit tough. I let my 3-D modeling subscription lapse (years ago) and now it will be expensive to re-up. So either I try to design the bearing in 2-D (I've never designed stuff in 2-D) or pay up to get back to what I'm used to using. Either way I'll build a bearing prototype before I commit the boat.
Saturday, February 27, 2016
Better Boat Day Today
I learned my lesson from yesterday, at least for awhile. I made a quick plan for what I would do today and then performed the plan with very little variation. I did get a little ambitious with the sander, but this time it was in a good way. I laminated the aft keel piece, finished the last of the heavy material removal parts of scarfing the frame and did some touch-up joint filleting with filled epoxy. I use the term filleting very liberally, mostly I just make sure the bulkhead to stringer/chine/shear joints don't have any gaps.
Next steps will be do finish sanding of the frame, and start fitting the keel. I'm a little unsure of where I need to cut separate planks at the bow. I'll be going through pictures on the K-designs yahoo group to see if I can find some examples. I think the bows of the 7.5 and 8.6 are similar.
Next steps will be do finish sanding of the frame, and start fitting the keel. I'm a little unsure of where I need to cut separate planks at the bow. I'll be going through pictures on the K-designs yahoo group to see if I can find some examples. I think the bows of the 7.5 and 8.6 are similar.
Yesterday Was A Weird Boat Day
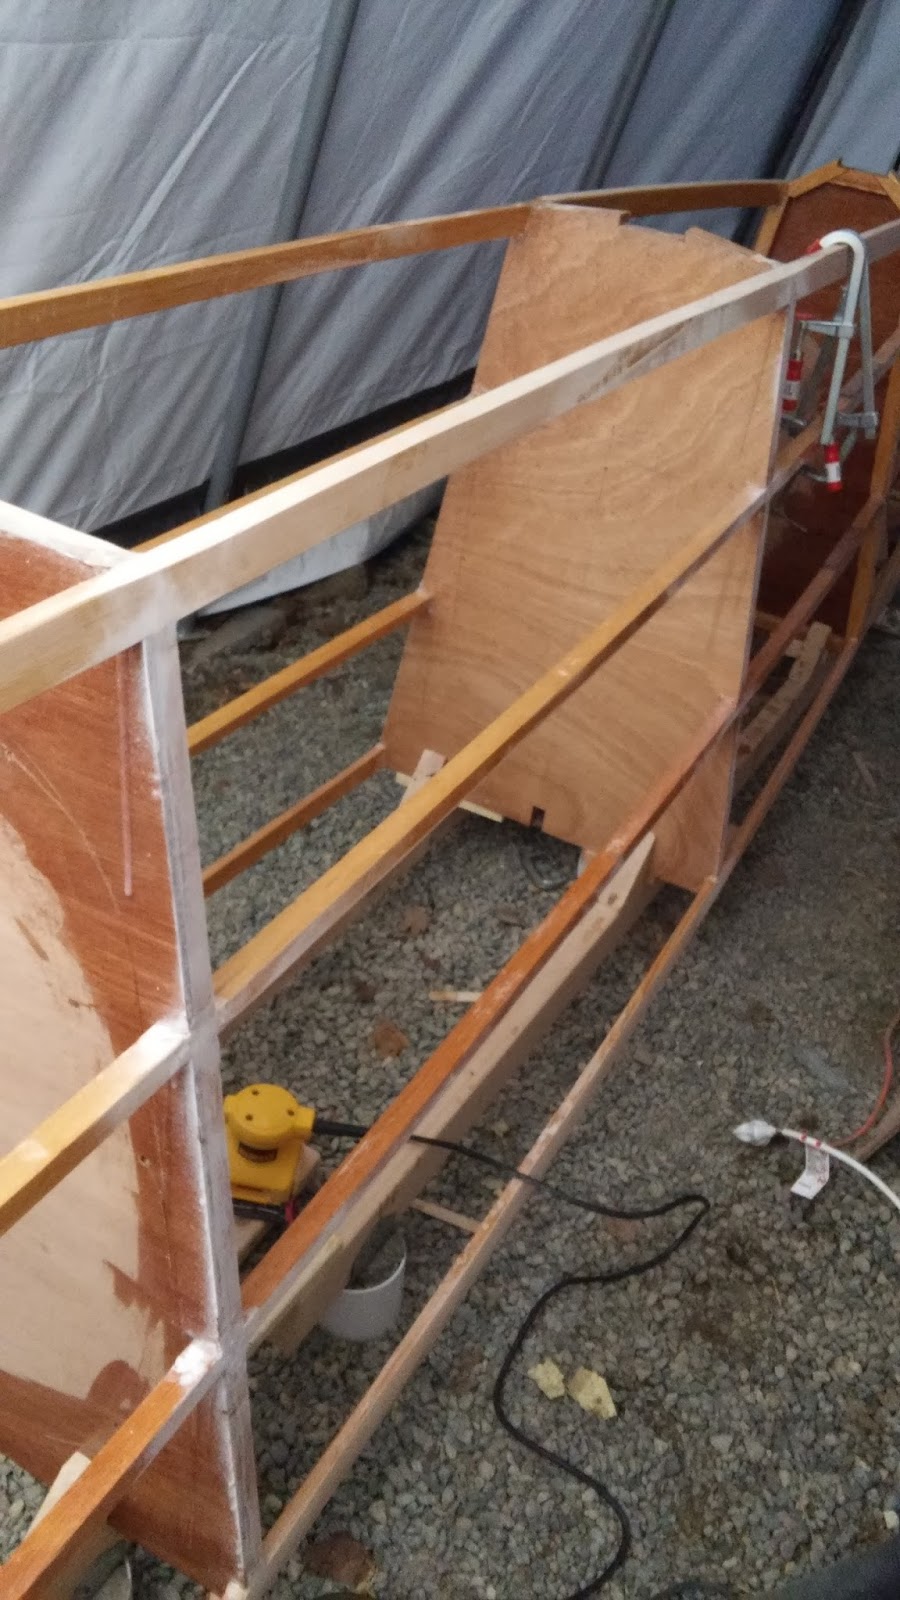
I did put a significant amount of work in the boat yesterday but it was an odd day and unsatisfying. Functionally I got some needed things done; I cut the pieces for the aft part of the keel, and I continued fairing. I think it was weird because toward the end I lost my focus and starting doing things impulsively. I think I'm getting frustrated with how long things are taking and I just need to recall the big picture, focus on my breathing, and basically chill out. I ended up over sanding a couple of spots, nothing that can't be fixed, just made more work for myself. Here are a couple of pics, first of bow starting to take its shape:

And then of the chine on the left where I'm just about done fairing.

I've also been distracted with some new and improved circular thinking on rigs. I will post under Sailing once I have it well thought out and maybe some figures too.

And then of the chine on the left where I'm just about done fairing.

I've also been distracted with some new and improved circular thinking on rigs. I will post under Sailing once I have it well thought out and maybe some figures too.
Thursday, February 25, 2016
Forgot About The Keel Transition
So I got a little excited about getting to fitting a keel. I forgot about the fact that the keel needs to make a transition from constituting the bottom plank to becoming part the interior structure. I had spent a good amount of time thinking about this when I was first studying the plans, but now its more real. So here is the detailed look at how I'm going to approach this joint.

The fabrication plan will be to clamp together the 9mm (dark green) keel piece with the 6mm planking filler piece and match scarf them with the keel forward section. I will leave the planking filler long and wait to glue that in until I know how long a filler is required. This will let me cut a filler to meet the planking rather than the other way around.
I likely wont get out to the boat shed today. Too many household duties and I missed my workout yesterday, so I have to make that up today.
Wednesday, February 24, 2016
Keel Blanks Made Today
It was a dry day, if still overcast, so I got the keel blanks cut, laminated, and a coat of epoxy put on one side. I was hoping to do some more fairing but wanted to make sure I had the keel on its way. Once done with the keel, I didn't want to do any fairing work while wearing the respirator. I only ended up missing out on about 30 minutes of work time. Here is a picture of the keel blanks.

I put cellophane under any areas where they are supported to make sure I didn't glue them to anything unintentionally. Also I used the polymer brad nailer to hold them together rather than fool around with a bunch of clamps. It was fun to make these, the only part I don't much like is handling full sheets of plywood. There are just big and awkward enough to be a pain. Tomorrow I will scarf these blanks together, apply one more coat of epoxy, and (if lucky) get to do at least a little more fairing.
I put cellophane under any areas where they are supported to make sure I didn't glue them to anything unintentionally. Also I used the polymer brad nailer to hold them together rather than fool around with a bunch of clamps. It was fun to make these, the only part I don't much like is handling full sheets of plywood. There are just big and awkward enough to be a pain. Tomorrow I will scarf these blanks together, apply one more coat of epoxy, and (if lucky) get to do at least a little more fairing.
Tuesday, February 23, 2016
Fairing Chines With A Twist
Despite having my daughter home sick for the day, I got out for a couple of hours to the boat shed to do some fairing. Today was an exciting day because I'm now doing the harder section on the chines. This section is where there they need to have more material removed due to the shape of the bulkheads. I used the gimp on both sides, I faired down my shims (used to account for two backward bulkheads), and set up a new guide for the next section. First a picture of the chine fairing, you can also see where the shims were sanded down to provide a flat surface for planking.

Next is a picture of the set-up for the next section, I'm using a new piece of scrap as a guide since the gimp is too deep and it was easier to use this piece, than cut down the gimp.

The last section (between the stem and BH1) will not require much in the way of fairing specific areas down. It looks like it will be more a matter of cleaning up epoxy runs and making things flat. Still before I can call myself done I have to hit a few spots with filled epoxy, so that makes for at least 2 more days. Also it's supposed to be dry tomorrow, so I will plan to start building up the keel. So for now my goal will be to start fitting a keel this weekend!
I don't know why I make these little milestones, the only schedule I really have is the voice in my head that really wants me to sail my own catamaran.
Monday, February 22, 2016
2 Sections Faired Today
I'm really enjoying fairing the frame. I didn't expect to, but it is nice to see flat plank-ready surfaces emerge after playing with the belt sander a little. I'm done with 4 sections, way ahead of where I thought I would be. Here is a pic of the progress so far.

Now things get a little more challenging though, here is a picture of the gimp set up for the next section.

Hopefully I can get though the rest of this during this week and then it will be onto routing butt joint reliefs in stringers-chines-shears, and making a keel.

Now things get a little more challenging though, here is a picture of the gimp set up for the next section.

Hopefully I can get though the rest of this during this week and then it will be onto routing butt joint reliefs in stringers-chines-shears, and making a keel.
Sunday, February 21, 2016
Picking Up Speed, Transom, And The Unexpected
I got to work on the boat both days this weekend which is unusual. Today I shifted gears a bit and did without the gimp since the shape I needed was simple. I was working on the aft section (just forward of the transom). The way the chines were sitting I just needed to make them flat off the inboard edge. Since I was using the inboard edge as my guide, I just took a red marker to the chines so I could see my progress as it went (the gimp is there because I had it set up from yesterday, it was soon removed).

Here is a before picture of one of the chines with a piece of lumber laid transerse across the chines.

Here is the after picture

The chines were short work, the shears of course were much tougher. The fun part was that I chamfered down to the transom and like the way it looks. I also took the opportunity to clean up some epoxy runs on the transom to start trying to make it look pretty. Below is a picture of the transom as I left it (still some filling and sanding to do).

So now for the unexpected. I noticed at on the stringers there was a tiny bead of epoxy that settled along the bottom outboard edge of the stringer all along its length. A picture would not help because I could barely see it in front of me. I could however feel it easily. So I sanded it off. Here is a picture showing the aftermath, you can see where it was because of the white stripe left by abraded epoxy.


Here is a before picture of one of the chines with a piece of lumber laid transerse across the chines.

Here is the after picture

The chines were short work, the shears of course were much tougher. The fun part was that I chamfered down to the transom and like the way it looks. I also took the opportunity to clean up some epoxy runs on the transom to start trying to make it look pretty. Below is a picture of the transom as I left it (still some filling and sanding to do).
So now for the unexpected. I noticed at on the stringers there was a tiny bead of epoxy that settled along the bottom outboard edge of the stringer all along its length. A picture would not help because I could barely see it in front of me. I could however feel it easily. So I sanded it off. Here is a picture showing the aftermath, you can see where it was because of the white stripe left by abraded epoxy.

I knocked out an entire section today and should be able to that again for the next section, since there is a relatively small amount of material to be removed. after that it will go slower. I want to start making the keel but need to work outside for that, and we are seeing steady rain in Seattle (surprise). If I was smart I would get my plan and materials ready and be ready to strike if we get a sun-break or (do I dare) a dry day.
Saturday, February 20, 2016
Fairing Continues....
I used the gimp on the chine, and the shear for the second side of section 1 today. Its great on the chine but I'm beginning to question its usefulness for the shear. It is just harder to get it to follow the edge you need when it is sitting vertical. I end up stopping and checking for vertical match between the stringer and the shear with a straight edge. Either way fairing one chine section and one shear section (section is one opening between bulkheads) is good bit of work and I break a good sweat when holding the sander in a vertical position. My goal is to do this much every day until done. Hopefully I can follow through with that. Here is a picture of the fairing work done today.

Friday, February 19, 2016
Liking the Hitachi Sander
I have to preface this post with the fact that I have never used a belt sander. That said, in my first foray using this tool I am pleased. It took my awhile to get used to handling the thing and trust that it wasn't gouging my boat. Once I got the hang of things, I cranked up the speed and had at it. Things could have gone faster but I don't trust myself yet with coarse sandpaper. I like my approach of sneaking up on where I want to be rather taking any risk. I hooked the sander up to the Shop Vac and plugged in through a relayed switch (so when the sander is on the vacuum kicks on as well). Here is a pic of the set-up.

A few notes on the tool: it has s little window near the front so you can see the leading side of the business end as you use it. Also with the vacuum connected I was blissfully unaware of any dust being created. I read an online review that said that the tool needed constant adjustment to keep the belt centered. I think this is user error. The adjustment knob is easy to use and I noticed that even if the belt gets pushed a bit to one side or another it will bring itself back to center on its own. If you start trying to correct that with the adjustment knob everytime it happens you really will spend all your time adjusting. Finally one of the deciding factors for me in choosing the Hitachi over the Porter Cable was that the Hitachi felt lighter (turns out it is 1.25 lb lighter). I knew lighter would be better but I should emphasize it is much better. Today I used it on a vertical surface and got a quite workout using the lighter tool.

A few notes on the tool: it has s little window near the front so you can see the leading side of the business end as you use it. Also with the vacuum connected I was blissfully unaware of any dust being created. I read an online review that said that the tool needed constant adjustment to keep the belt centered. I think this is user error. The adjustment knob is easy to use and I noticed that even if the belt gets pushed a bit to one side or another it will bring itself back to center on its own. If you start trying to correct that with the adjustment knob everytime it happens you really will spend all your time adjusting. Finally one of the deciding factors for me in choosing the Hitachi over the Porter Cable was that the Hitachi felt lighter (turns out it is 1.25 lb lighter). I knew lighter would be better but I should emphasize it is much better. Today I used it on a vertical surface and got a quite workout using the lighter tool.
"Bring out the gimp"
Because one of my many moral failings is a concerning love of the movie Pulp Fiction, I named a tool I made the "Gimp". Specifically I was worried about how to change the angle of chine and shear scarfs in a progressive way between bulkheads. What I came up with was to make a plywood plate that I fit between and flush with bulkheads and clamp in place as shown below.

This gives me a guide so I can match the angle I'm sanding down on the chines/shear to match the one shown by the gimp. As shown below.

Here it is as set up for the shear.

I measured the distances between bulkheads and made the gimp to the length of the largest one. Then the next section will be the next smallest one and I will trim the length of the gimp to fit. This will continue until at the end the gimp will be much smaller and likely very beat up, but this way I only need to make one. Today I sanded down the chine and shear one one side of the first section and left things set up and ready to do the chine on the other side. One more picture because I can't resist.

I also "finished" my epoxy coating task. I put that in quotes because every time I turn on the sander I make for epoxy coating work. Today was a fun day in the boat shed, its amazing how much better things look when the chine and shear match the bulkhead profile.
Thursday, February 18, 2016
Knocking Out The Highest Priority Stuff
It's been a slow week for the boat, but I do take some solace in that I did do the couple of things that I figured were the highest priority (ordered epoxy, and bought a belt sander). The incomparable Bob Burt had recommended the Porter Cable but as usual, I ignored good advice. I got the Hitachi instead. It has a higher amperage motor and is bit less heavy for a bit less money.


It seems like there is not a lot of daylight between brands in the middle of the market. I stayed away from the real cheap ones but wasn't willing to re-arrange the family finances to get a Festool. If im unusually disciplined I'll read the manual tonight.
Wednesday, February 17, 2016
Drum-Roll Please
I didn't get to work on the boat yesterday. And I place the blame squarely on the Seattle Public School District. They seem to have a yearly meeting, the title of which must be "How can we be a PITA to the parents of Seattle" (read we like to take random days off throughout the year). Alright I'll stop the rant there, although I would like to continue.
The sad part of it all is that it wasn't much work to trim the breasthook (Fein tool) and remove the hold down frame. So here are the pics. First one from the customary angle.

And then as much of a full boat view as I can muster.

The stem did move a tiny bit when I released the frame but it was so slight, and I overshot on the bend a bit to begin with so I think I'm in good shape. Also I'm very close to being done with my epoxy coating task. At this point the highest priority items will be getting myself to a hardware store to buy a belt sander and ordering more epoxy and epoxy supplies.
Monday, February 15, 2016
Stem Superstructure
I put on the stem superstructure pieces today. I cleaned up the epoxy runs first with the Fein tool (effective and fun to use). Also got the last "breasthook" on the chines. Here are the pictures first of the stem.


And then the breasthook.

Tomorrow I will trim the breasthook and remove the hold down frame! And take another turn at epoxy coating raw wood (the bain of my existence).


And then the breasthook.

Tomorrow I will trim the breasthook and remove the hold down frame! And take another turn at epoxy coating raw wood (the bain of my existence).
Sunday, February 14, 2016
Stem Attached!
I'm really getting close to fairing now. I installed the last shim (on bulkhead 2), trimmed the shears and chines at the transom, cut the shears at the stem and installed the stem. Also getting close to done on epoxy coating. Here are the pictures, first of the transom,

and below showing the stem installation.

I still need to put some superstructure framing on the stem and put the second top breasthook on the chines before releasing the hold down frame. I could have put the breasthook on today but would have run a high probability of gluing my blue Irwin clamp to the chine in the process. The other thing I need to start considering is building up a keel blank since I think the keel may be the first step in planking.
Friday, February 12, 2016
I'd Rather Be Lucky Than Talented Anyday
I spent some good time out in the boat shed today. Got the 2nd shear installed (that's where the luck came in), started putting on the shims on the backwards bulkheads, and continued my epoxy coating task. Here is the picture of where I got lucky.

The vertical piece of white wood is part of the hold down frame for the chines. I just got the shear inside of it and so did not have to upset the chine position. For the chines I'm going to add one more breasthook and attach the stem to the shears, stringers and chine before releasing the hold down frame. This way, if it still moves at least I'll know I threw everything at it. The downside is that if it does work I'll know what is sufficient but not what is necessary.

The vertical piece of white wood is part of the hold down frame for the chines. I just got the shear inside of it and so did not have to upset the chine position. For the chines I'm going to add one more breasthook and attach the stem to the shears, stringers and chine before releasing the hold down frame. This way, if it still moves at least I'll know I threw everything at it. The downside is that if it does work I'll know what is sufficient but not what is necessary.
Thursday, February 11, 2016
First Shear Installed
Yesterday I got overcome with kid and family stuff, but today I got out and got a bit done. Not sure why but my heart wasn't in it today so I didn't push as hard as a could have. I got the first shear installed and trimmed the top chine gusset at the bow. Here are the pictures.


The shears are bent a bit and opposite the chines. I'm considering attaching the stem before releasing the chine hold down frame. The idea being that the shears and stringers will help to keep the chines in place. I'm just getting the feeling that no matter what I do this is going to move, just a matter of how much.
Wednesday, February 10, 2016
Note on Suppliers
I've been thinking about doing this post for awhile, so here goes. I have to say that I have had very good luck in finding materials and supplies for building my boat. That being the case I have not had to change my suppliers. I say this so that it is understood that this list is just where I have found what I needed with a comment if applicable.
Epoxy and Fillers: RAKA
I'm using the non-blush formulation because it is humid in Seattle and I really don't want another step (washing the amine blush then drying before I can get going again) in my process. I've been happy with the product and I did give them a call for some newbie questions. They were patient and helpful. The only downside is that they are in Florida so shipping takes a bit longer and costs a bit more for me. BTW: I chose RAKA on the strength of a comparison test I found online (couldn't find it again to link here). RAKA didn't win in many categories the test covered, but it was alway near the top of the field in all categories.
Carbon Fiber: Fiberglast
I did do a bit of shopping on this and these guys seemed to have the best price. They also answered the phone with a human to clear up some info, that really should have been on their website.
Epoxy Supplies: Duckworks
Duckworks is an odd site in that they have good prices on some things but noticeably higher in others. I've been using them for epoxy stuff like gloves, squeegees, mixing cups, sticks, and brushes (also got the polycarbonate brad nailer from them). They are reliable. When the time comes I will give them a look for all the random boat hardware I will need as well.
Tools: Amazon, Home Depot and Hardwick's
I like to buy tools new and nearer the higher end, this is one area where the extra $ are well spent. Since I usually know what I want I go for the best price I can find with a modest internet search. With the notable exception of clamps, these I try to buy at Hardwick's here in Seattle. The place is amazing and has an entire isle devoted to clamps of all persuasions.
Lumber: Dunn Lumber or Cross Cut Hardwoods
I'm spoiled for lumber in the pacific northwest. For clear vertical grain fir I go to Dunn which is very close to the house. For marine grade plywood I go to Cross Cut. Both have been easy to do deal with and reliable.
Tuesday, February 9, 2016
Keep Turning The Crank
Busy day with kids (the little one's swim day). But I did get out to the shed for about an hour. Finished bonding scarf joints for the shears, trimmed the bottom breasthook on the chines and added the top one, and of course continued epoxy coating exposed wood. Here is a picture of chine to chine joint at the bow. By the way the Fein tool made quick work of trimming down the bottom breasthook.

I'm getting more and more worried about what is going to happen when I remove the hold down frame. Also not looking forward to installing the shears since they will have to be clamped up into place. Nothing to do now but to keep turning the crank.

I'm getting more and more worried about what is going to happen when I remove the hold down frame. Also not looking forward to installing the shears since they will have to be clamped up into place. Nothing to do now but to keep turning the crank.
Monday, February 8, 2016
Superbowl is Over Time To Work On The Boat
This post might be a bit scattered, only because the work being done is bit scattered too.
First thing to cover is progress made on applying gussets to the chines at the bow. Here is a fun picture showing epoxy boogers that dried where I bonded the chines to each other. Needless to say I sanded down the boogers to a flat surface before proceeding.

Later I bonded on this piece of 4mm Okume. I already had the bond side epoxy coated. I will trim this to match with the Fein tool after it cures.

So I put on bulkheads 1 and 2 backwards. I realized this right after I did it. Now I have to deal with the implications of that. First a picture showing the problem with having backwards bulkheads. As you can see below there is no material available to remove to make the bulkhead edge match the stringer.

I'm going epoxy on a 4mm Okume shim on the outside of these bulkheads and then sand those down until I can get a flush surface on which to install the planking. Below is a picture of what that should give me to sand down after.

I'm steadily making progress in epoxy coating all the raw wood everywhere, it is slow and tedious. One cool thing is that the epoxy changes the color of the wood so you can see progress.

Also I started to bond the scarf joints for the shear timbers and put on butt straps over the low angle stringer scarfs . Still lots to do, for now I'm just letting the epoxy cure.
Saturday, February 6, 2016
Planning The To Do List
I've made a small amount of progress in epoxy coating all the exposed wood. The problem is that as I'm doing this I'm seeing and thinking of all the little things that need to be done next. Honestly a to do list that is only in my head and keeps changing stresses me out. So this will be the post that brings order out of chaos.
First thing to consider is that my wife has a home office in the basement. This matters because my boat shed is right outside her window. This matters because my air compressor is just inside my boat shed, outside her window. This matters because my air compressor is supernaturally loud. This matters because I need my air compressor to use my polymer brad nailer. This matters because I need the nailer to install the chine breasthooks and buttstraps on my less than spec stringer scarf joints.
I'm not going to get much time this weekend to spend with my boat (it's Superbowl weekend, I'm going to grudgingly cheer for Carolina). But I need to do the stuff that requires the compressor, while my wife is not in her office. So here is the list.
1. Stinger buttstrap and breasthook installation (need compressor)
2. Build up scarf joints on shear timbers
2. Epoxy coat exposed wood on stringers, chines and shears
3. Install shears
5. Trim and bond shears at bow
5. Apply fillets to joints as required
6. Trim shear and chine overhangs at transom
7. Install stem (this may take a few steps)
8. Begin fairing
Once I start fairing, by which I mean using the belt sander I will feel much better.
Thursday, February 4, 2016
Next Steps Will Be Slow Going....And an Admission.
When I put on the stringers and chine I did not epoxy coat them first. I figured that it would be easier to epoxy coat them when I did not have to worry about bonding them to a work surface in the process. I still think that is valid, but I also just wanted to get going. So now I have to pause to epoxy coat stringers and chines (only inside edges of chines as outsides will see the business end of a belt sander). So I will be epoxy coating stuff for a while and making the "breasthooks" for the chines at the bow. These will be 4mm Okume, scrap from my rudder making days. Also still need to build up shears.
Now for the admission. I don't actually own a belt sander (gasp!). So as I'm epoxy coating, I will be looking at belt sanders and specifically strategies for fitting a rail as a guide. I hope to do something a bit more sophisticated than strapping a piece of PVC pipe to the side of sander, but we will see.
Now for the admission. I don't actually own a belt sander (gasp!). So as I'm epoxy coating, I will be looking at belt sanders and specifically strategies for fitting a rail as a guide. I hope to do something a bit more sophisticated than strapping a piece of PVC pipe to the side of sander, but we will see.

New Thoughts on Rig Approach
I've been spending a lot of time thinking about the rig for the boat and have an idea that was sparked by an approach that Bernd came up with for his new tri-maran (See posts here: https://groups.yahoo.com/neo/groups/k-designs/conversations/messages/5740 ) The approach Bernd shows gets me most of what I want (reefing using a rotating mast, wishbone boom, luff pocketed sails). Its limitation is that you can't throw the boom all the way out because eventually the inside of the wishbone will hit the mast. So what if the anchor for the wishbone also rotated about the mast axis? Here are some sketches. This one shows a plan-form view. The idea is for the anchor point for the wishbone to transfer loads from the boom rigidly to the deck through the bearing which is shown in the second sketch.


I'm now trying to think of drawbacks, and convince myself I could build it all myself at reasonable cost. If I can see it coming together I will start to run some sizing numbers to further assess its viability.
Wednesday, February 3, 2016
2nd Chine Bonded
Epoxy is really amazing stuff. I had to push these chines into place using a significant amount of effort. Then held them in place with well tightened heavy metal clamps. Then once the epoxy cures it holds the chine in place no problem. And it's not like I'm graceful or neat in the application. I broke away today to glue on the second chine. This was so much easier the second time.


Monday, February 1, 2016
1/2 of Stringer and Chine Glue Complete
Rather than try to cram this into one glue application I glued one stringer and chine today. I had time, but I didn't want to upset the clamps done on the first side when I set up and glued the other. So I decided to let the epoxy cure before moving any clamps. It doesn't look that different so I just added one picture showing the glued stringer-chine joint.


Subscribe to:
Posts (Atom)